
Table of Contents
- Why shoot jewelry on black?
- Gear & materials checklist
- Jewelry black background lighting: the essentials
- Step‑by‑step setup (GemLightbox Pro)
- Camera & smartphone settings
- Finishing touches (subtle post with GemSparkle)
- Troubleshooting & black background photography tips
- Where to use your black‑background images
- FAQs
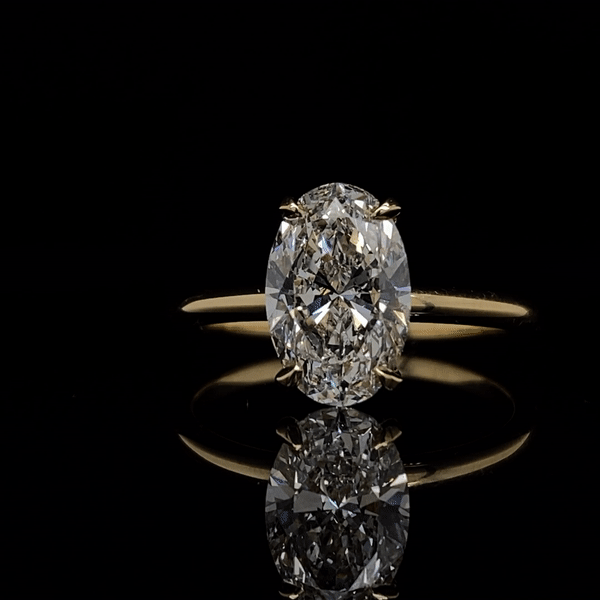
A diamond ring captured with GemLightbox and Eclipse.
Why shoot jewelry on black?
- Focus: Deep backgrounds push attention to metal edges and stone color.
- Luxury signal: Black backgrounds are associated with premium positioning.
- Color pop: Emeralds, opals, paraibas, and diamonds read richer against black.
Differentiation: Social feeds and homepages dominated by white benefit from variety.
Gear & materials checklist
- Controlled light: GemLightbox Pro for even, enclosed lighting and reflection control.
- Background: Matte black acrylic, black velvet, or the dedicated black insert for your setup (avoid shiny materials).
- Supports: Museum putty/wax, fine fishing line, acrylic risers for elevation/reflections.
- Cleaning: Gloves, blower, microfiber, alcohol swabs (dust is brutal on black).
- Phone/Camera: Modern smartphone or DSLR/mirrorless + macro; tripod if using a camera.
Fast path: Place your piece in GemLightbox Pro, use the black background insert, and follow the settings below for instant, repeatable results.

Opal captured with the GemLightbox and Eclipse.
Jewelry black background lighting: the essentials
Lighting—not the backdrop—is what truly creates “solid black.” Control light spill and expose for the subject.
- Single dominant source: Start with the GemLightbox Pro’s top light to create a smooth gradient across metal without flooding the background.
- Edge definition: Add subtle side/edge fill (built‑in LEDs or reflectors) to separate silver/white gold from black.
- Flag the spill: Use black cards (negative fill) inside the enclosure to tame unwanted reflections and deepen blacks.
Distance matters: Keep jewelry forward; let the background fall back so less light reaches it (faster falloff = deeper black).
Step‑by‑step setup (GemLightbox Pro)
- Prep the piece: Clean thoroughly (dust and lint glow on black). Handle with gloves.
- Set the stage: Place a matte black insert or velvet on the platform. Avoid creases and shine.

- Position: Bring the piece toward the front third of the box. Use putty to stabilize rings and pendants.
- Light: Start with top light only. Add minimal side light for contouring. Insert black flags to absorb spill.
- Compose: Slightly tilt faceted stones to catch a primary reflection; avoid mirror‑like hot spots on polished metal.

- Test shot: Zoom with your phone (2× optical if available) to avoid wide‑angle distortion.

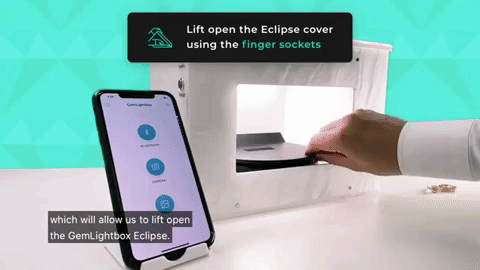
Just like that, you’re able to capture jewelry photos and videos on a flawless black background. You don’t need to post-process the photo or video anymore as the output is of high quality, see the results below.


Don’t forget to click save after photographing so you can send it directly to your prospective buyers by email or post it to your social media platforms.
Camera & smartphone settings
Manual/DSLR
- Mode: Manual.
- ISO: 100–200.
- Aperture: f/8–f/13 for depth and sharpness.
- Shutter: Adjust until the background reads near‑black while the subject is correctly exposed.
- WB: Custom/Daylight; lock it for consistency.
- Histogram: Keep most background pixels left of center without clipping subject highlights.
Smartphone
- Focus/exposure lock: Tap‑hold on the jewelry; slide exposure down until the background deepens.
- Zoom: Use 2× tele lens if available (avoid digital zoom beyond 2×).
- Capture: Shoot HEIC/RAW if supported; otherwise highest‑quality JPEG.
- Stability: Brace elbows or use a small tripod.
Tip: If the background isn’t going black, decrease exposure, add flags, or increase distance to the background. Backlight leaks are the usual culprit.
Finishing touches (subtle post with GemSparkle)
Great lighting minimizes editing. For clean polish without artifacts:
- Open your shot in GemSparkle; use light contrast and clarity to deepen blacks and refine edges.
- Spot‑heal remaining dust. Avoid over‑sharpening which creates halos on black.
- Export consistent crops (1:1 for PDP thumbnail, 4:5 for social), and name files descriptively (e.g., oval-emerald-diamond-halo-ring-black-background.jpg).
Create striking black‑background shots—fast
Use the controlled lighting of GemLightbox Pro and finish with one‑click contrast in GemSparkle. Book a quick demo →
Troubleshooting & black background photography tips
- Background looks gray: Lower exposure, bring the subject forward, add black flags, and reduce fill.
- Metal is flat: Add a small edge light or rotate the piece to catch a specular highlight.
- Gemstone color is dull: Tilt slightly toward the light; aim for a single dominant catchlight.
- Reflections of you/room: Enclosed box + flags; wear dark clothing; raise the camera slightly.
- Dust everywhere: Anti‑static blower, microfiber, and light cloning only as needed.
Quick black background photography tips
- Keep materials matte; shiny black = mirror.
- Use negative fill (black cards) to sculpt shape and deepen shadows.
- Shoot tethered or review at 100% to catch dust before moving on.
- Maintain a style guide: angle, crop, reflections, and background density.
Where to use your black‑background images
- Home/landing hero: High‑drama banners featuring signature pieces.
- Collection intros: Alternate with white‑background shots for rhythm.
- PDP galleries: Use black as a secondary angle to show color and sparkle.
Social ads: Test black vs. white creatives; black often wins attention in bright feeds.
FAQs
Do I need a black backdrop if my lighting is good?
Controlled lighting can “crush” backgrounds toward black, but a matte black insert/velvet inside GemLightbox Pro speeds things up and improves consistency.
How do I avoid harsh reflections on polished metal?
Use the enclosure to create large, soft sources; angle the piece to bounce reflections away from the lens; add black flags for shape.
Can I shoot great black‑background images on a phone?
Yes. Lock focus/exposure, use the tele lens, control spill, and finish with subtle contrast in GemSparkle.
When should I use white vs. black?
White is best for marketplaces and specs‑first PDPs; black is ideal for luxury storytelling, color pop, and ads. Use both in your mix.


Leave a Reply